The Delves of Ulbuka
As part of the Adventurer’s Chronicles, players now have access to the Delves of Ulbulka. These challenging encounters
can be spawned at the appropriate quest marker (???) using the corresponding yggrete shard. The shards
drop from nearby monsters (similar to retail).
- The delve gear that previously dropped from “wonder” NMs or voidwatch campaigns has been added to the correct delve encounter.
- Each delve supplies players with baylds on defeat and can be respawned by players who have additional yggrete shards.
- Yggrete shards are not affected by treasure hunter and considered ‘bonus loot’ (similar to beastmen seals).
- Monsters that drop Yggrete shards have a faster respawn timer (180s, down from 300s) than surrounding mobs.
- If grouping up, participants must be within 20y of the delve to be flagged to begin. Make sure your group is nearby before starting the encounter!
Ceizak Battlegrounds Celedon
Many of the encounters in Ceizak Battlegrounds have unique resistance stances where they’ll either become immune or absorb a type of damage. Keep watch for proc triggers to know when you’re doing something right (or, in some cases, doing something very wrong).
| Shard | Drops from… | Spawns |
|---|---|---|
| I | bight uragnites & twigtrip lapinion | Unfettered Twitherym |
| II | deathmaw orobon & blanched mandragora | Supernal Chapuli |
| III | careening twitherym | Transcendent Scorpion |
| IV | downy emerald & colossal spider | Mastop |
| V | fernfelling chapuli & frenzied mantis | Tax'et |
 (click to expand full-screen)
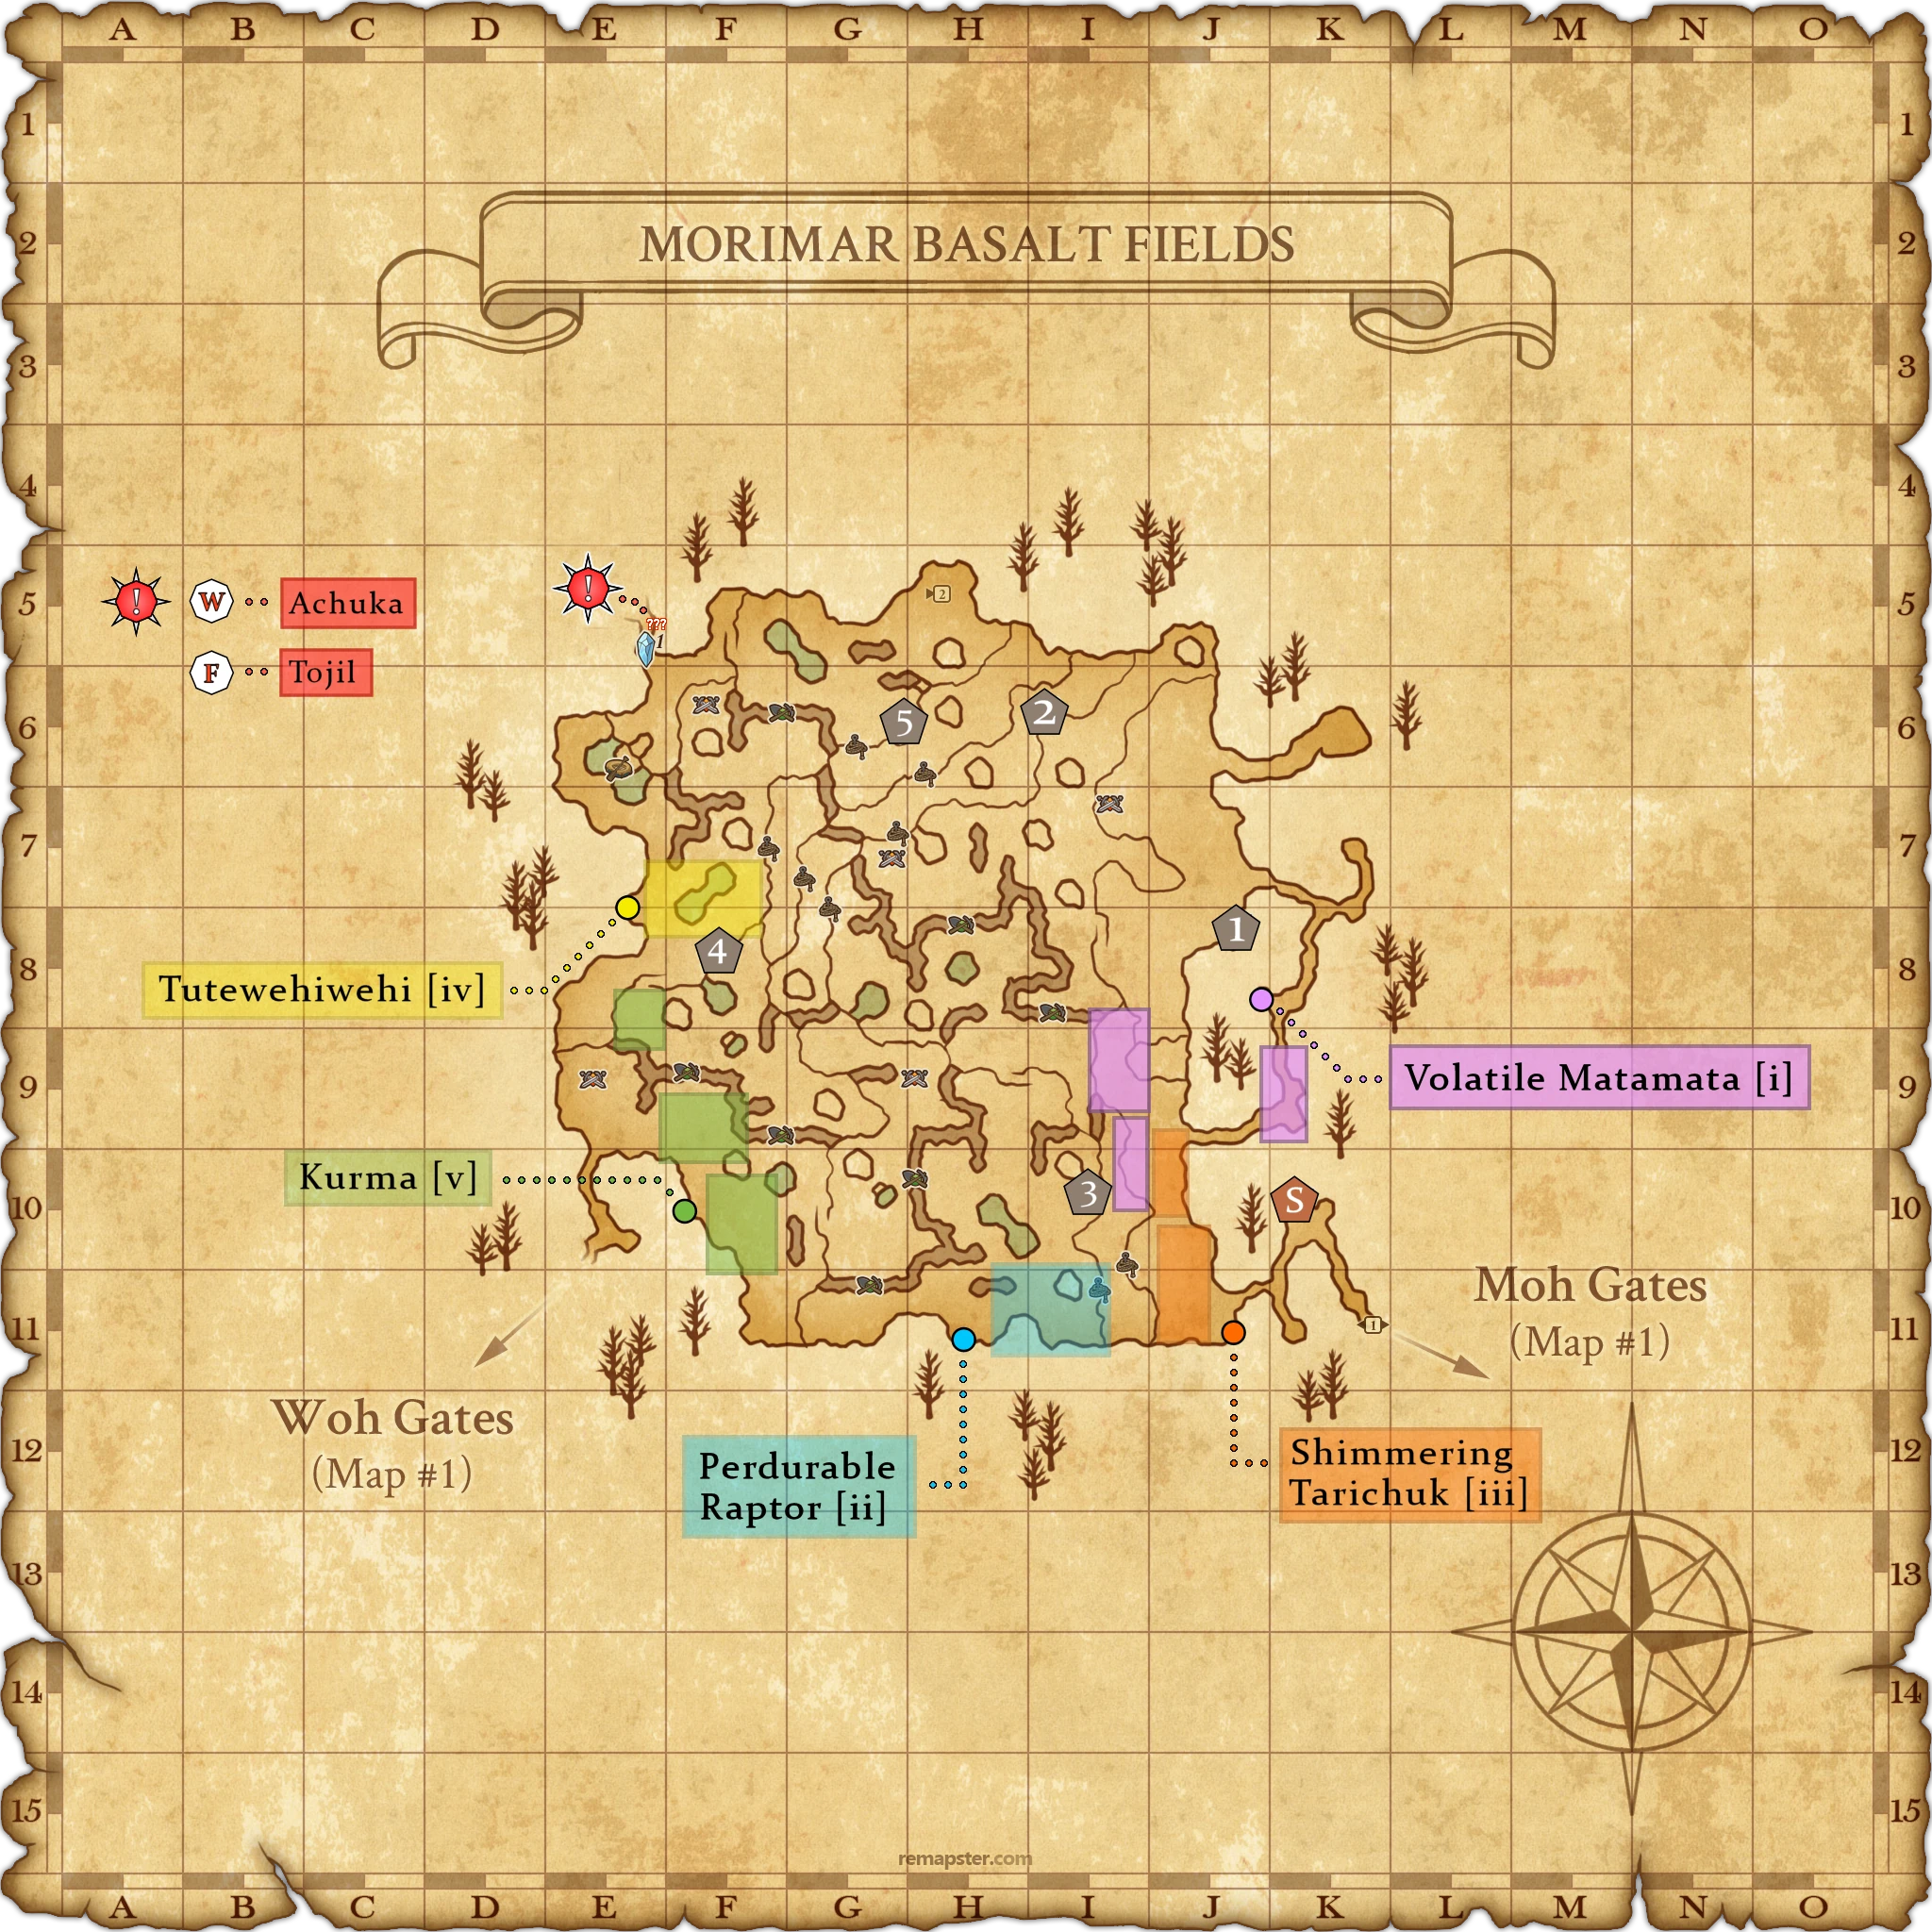
Morimar Basalt Fields Alizarin
Morimar Basalt Fields is home to several encounters that have potent aura effects. Some are distance based, HP based, or even in reaction to certain types of damage. Keep note on how each encounter reacts for best results.
| Shard | Drops from… | Spawns |
|---|---|---|
| I | tephra lizard & snowcap umbril | Volatile Matamata |
| II | volcanic wivre & tundra elf | Purdurable Raptor |
| III | maca maca & frosty twitherym | Shimmering Tarichuk |
| IV | acerbic jagil & sinewy matamata | Tutewehiwehi |
| V | felsic eruca & mountain peiste | Kurma |
 (click to expand full-screen)
Foret de Hennetiel Zaffre
In the shallow pools of Foret de Hennetiel, several mechanics from Morimar and Ceizak start to overlap in more challenging mechanics. Pay close attention to each encounter’s animation, whether or not they’re ‘hiding’ from you, and other visual clues to lead to victory.
| Shard | Drops from… | Spawns |
|---|---|---|
| I | zoldeff jagil | Faded Craklaw |
| II | bellicose tarichuk & perfidious crab | Aberrant Uragnite |
| III | hoary craklaw & careening twitherym | Divagating Jagil |
| IV | scummy slug & vorst gnat | Nerrivik |
| V | vampire leech & glutinous clot | Krabakarpo |
 (click to expand full-screen)
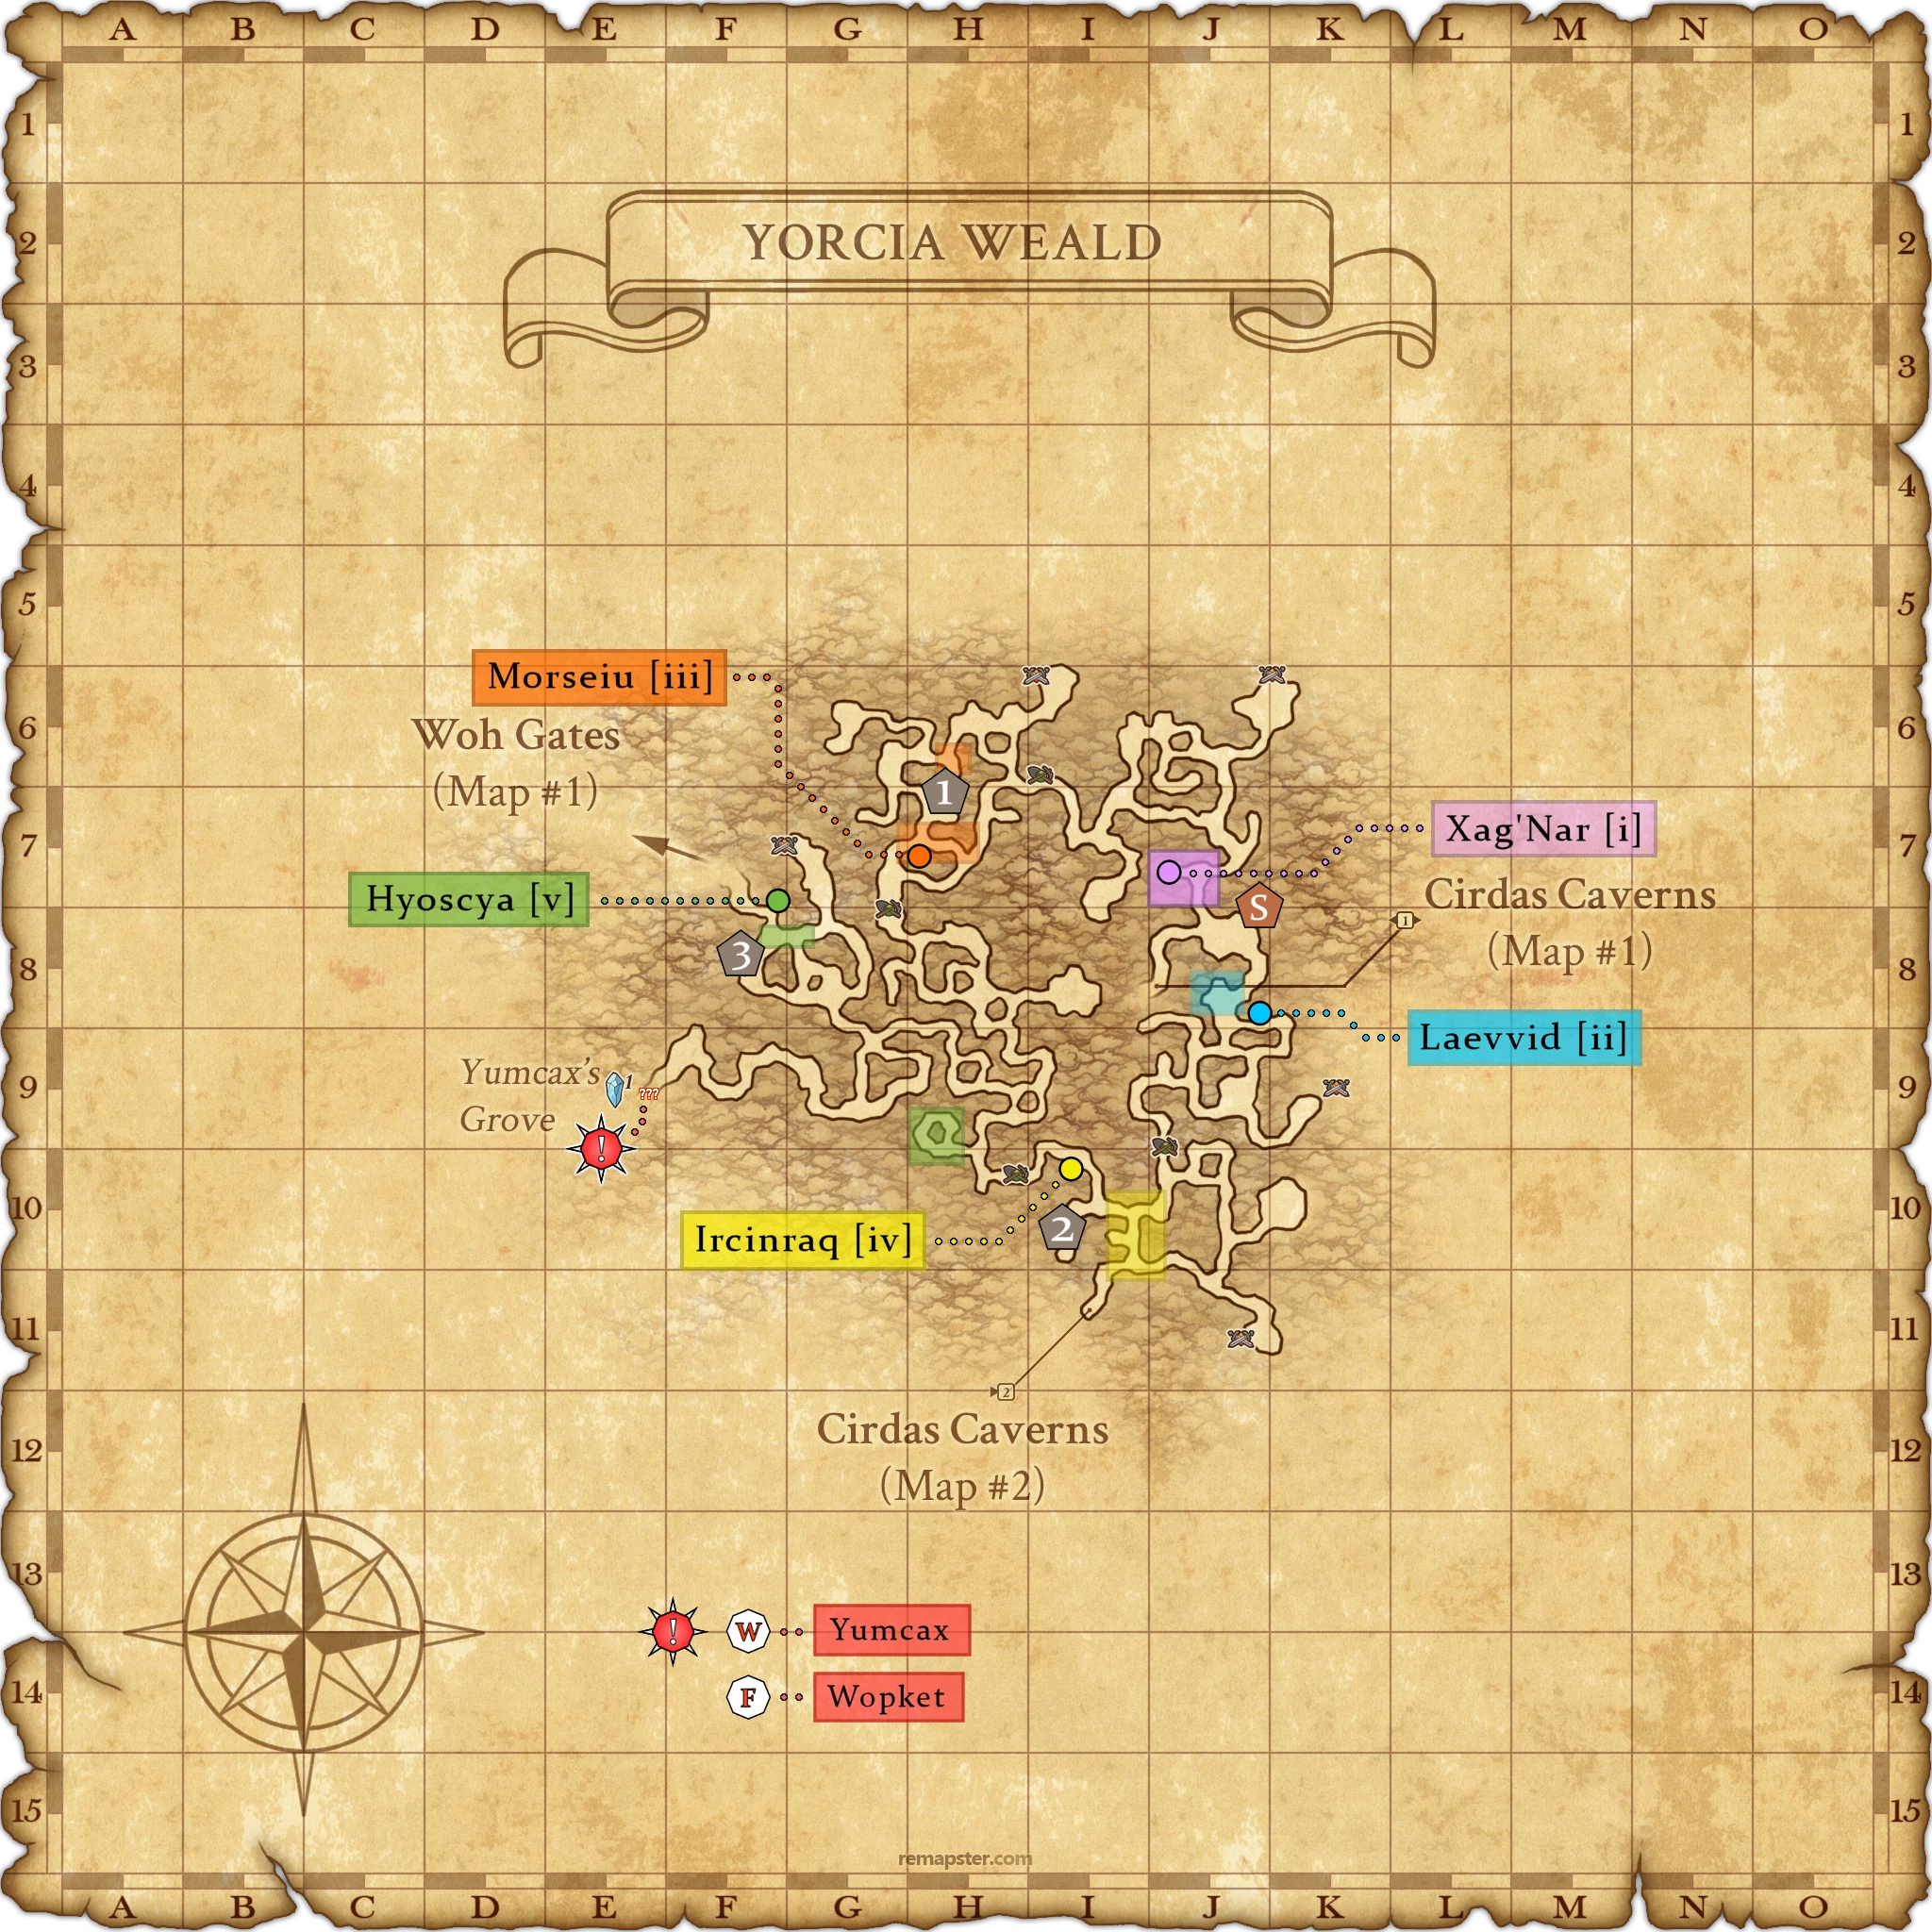
Yorcia Weald Russet
Several encounters deep within the trees of Yorcia Weald have time-based mechanics requiring players to coordinate their attacks and abilities with many status effects requiring players to be quick on the draw with Erase, Dispel, and an inventory of panaceas.

| Shard | Drops from… | Spawns |
|---|---|---|
| I | snapweed | Xag'Nar |
| II | bronzecap & shade-speckled spider | Laevvid |
| III | cheeky opo-opo & saptrap | Morseiu |
| IV | nascent sapling | Ircinraq |
| V | corpse flower & swollen chigoe | Hyoscya |
 (click to expand full-screen)
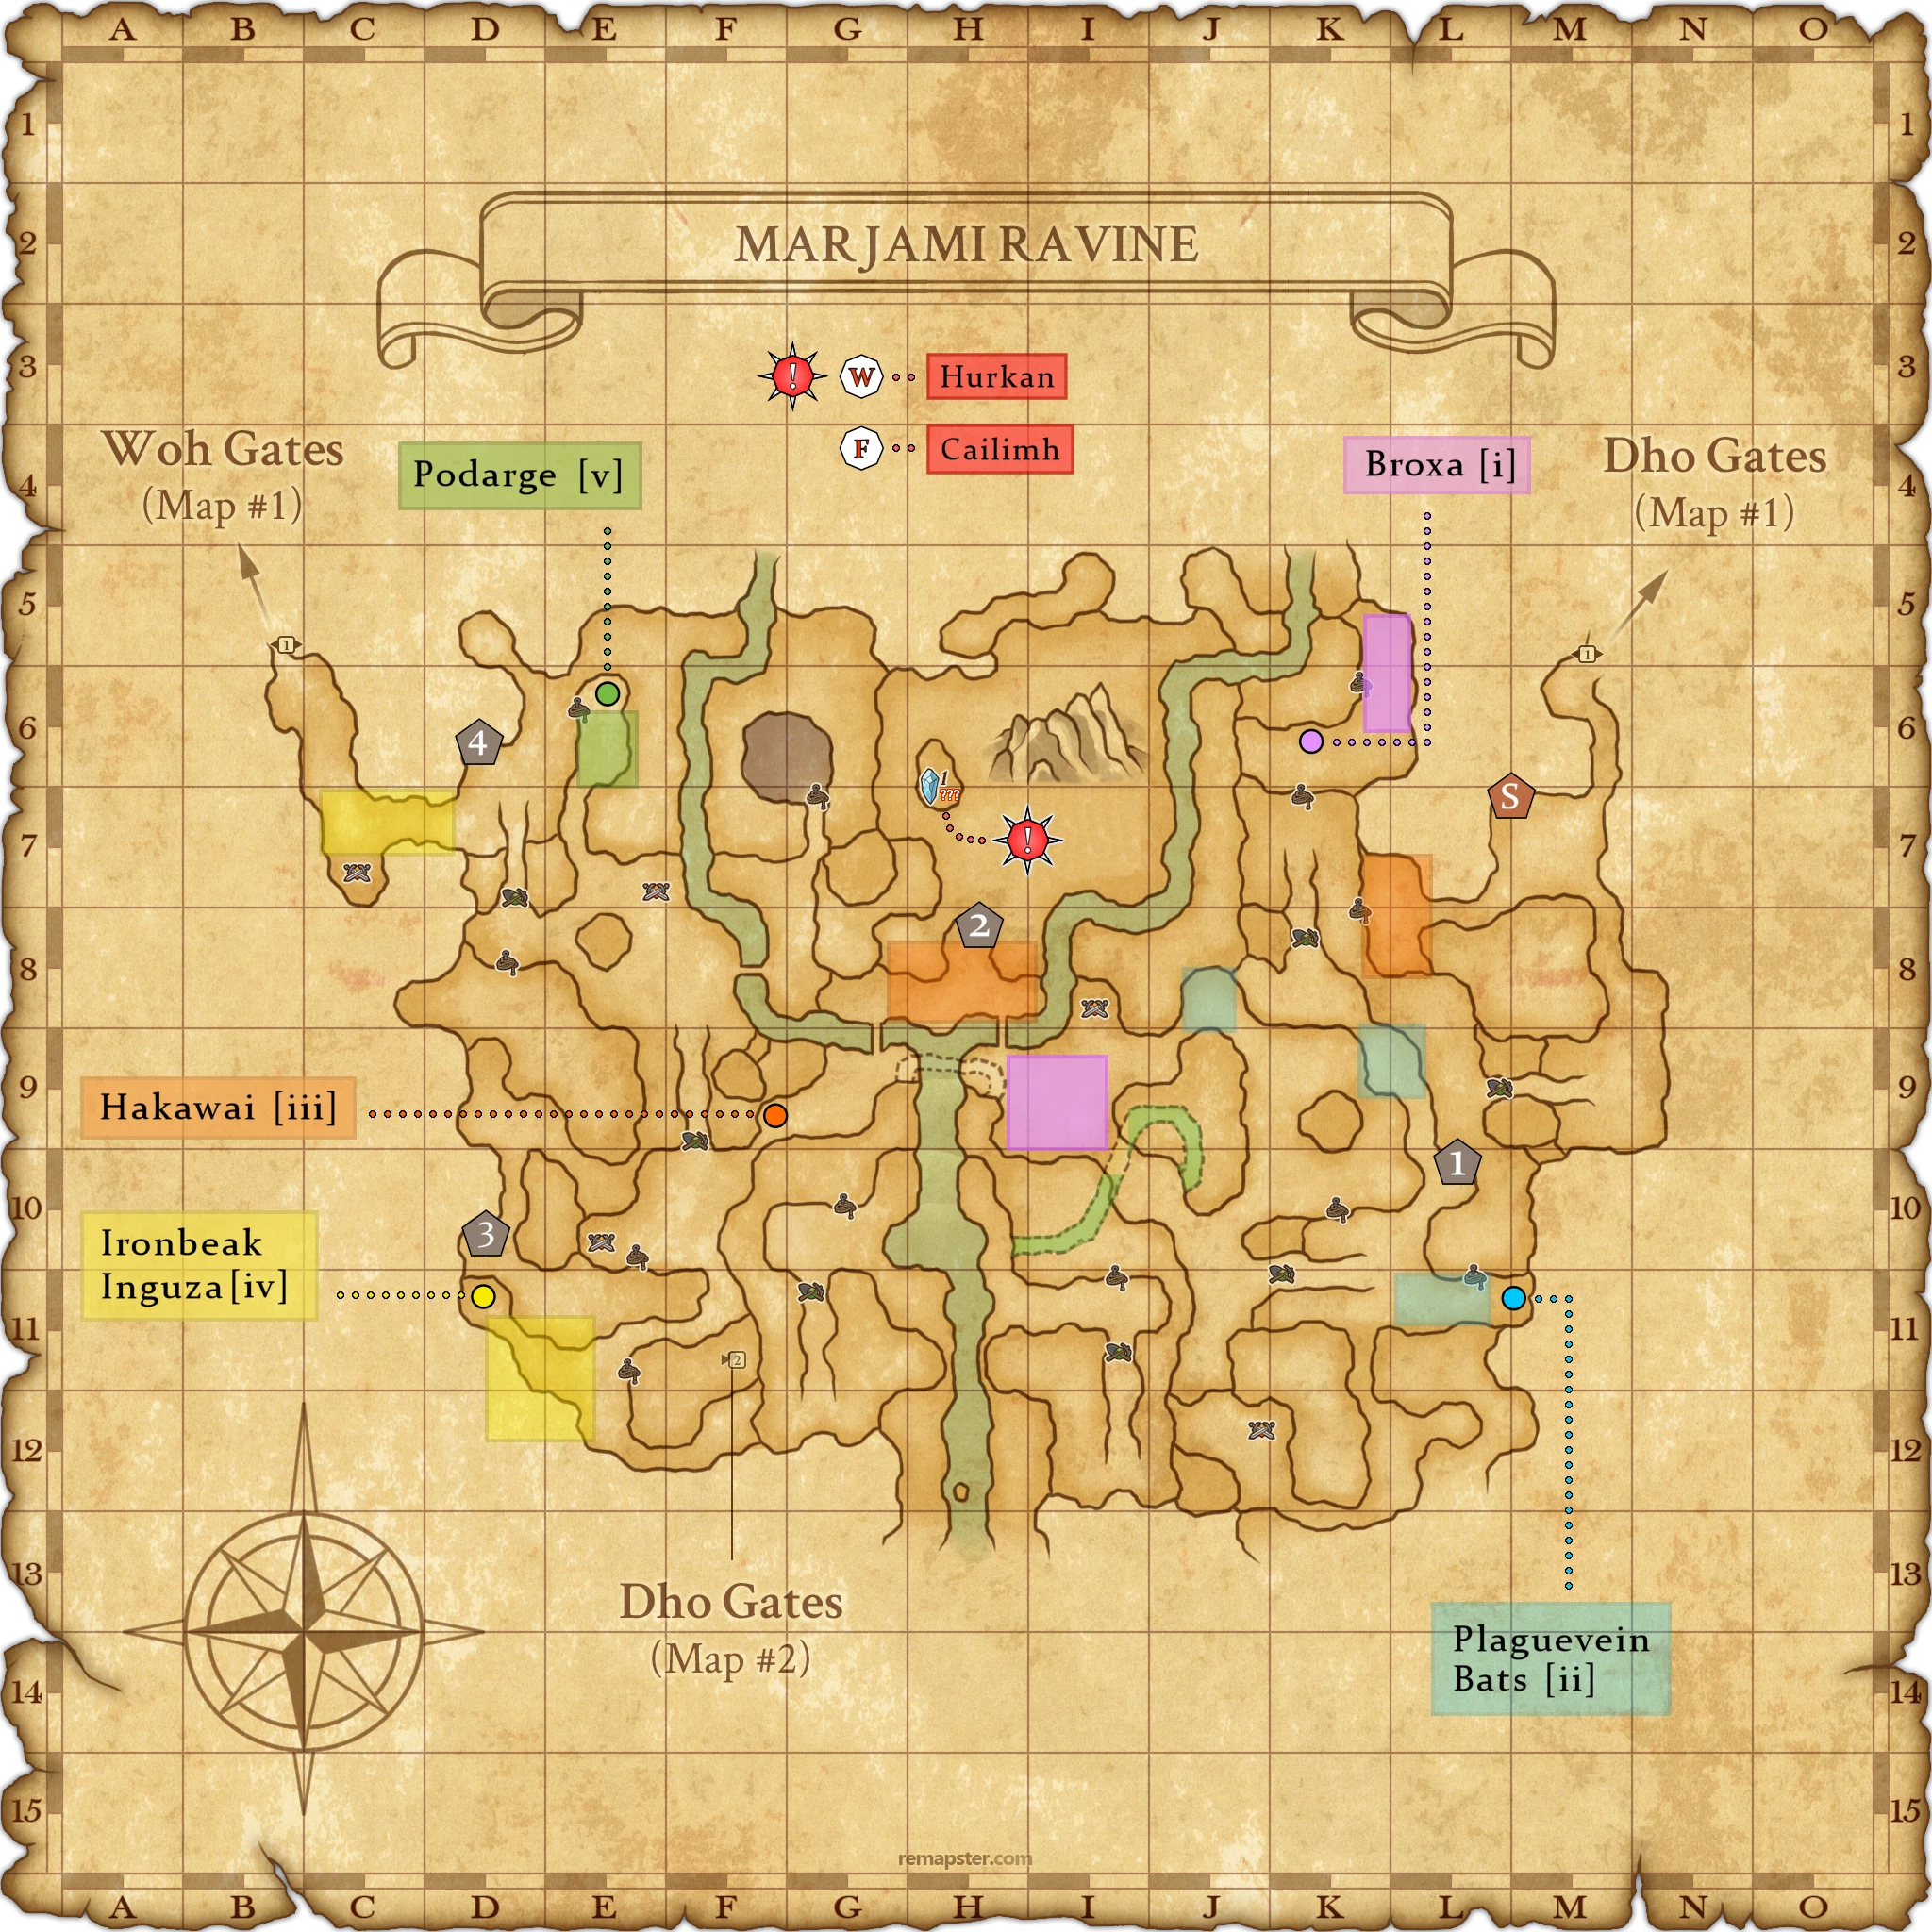
Marjami Ravine Phlox
The beasts of Marjami Ravine tend to vary their mechanics based on their own abilities, becoming immune to various damage types, more evasive, or even reflecting attacks.
| Shard | Drops from… | Spawns |
|---|---|---|
| I | longface colibri & stryx | Broxa |
| II | vinelash vulture & lapiniontrap | Plaguevein Bats |
| III | cliffclinger toad & whispering twitherym | Hakawai |
| IV | lapinion & tulfaire | Ironbeak Inguza |
| V | canyon apkallu & riverscum | Podarge |
 (click to expand full-screen)
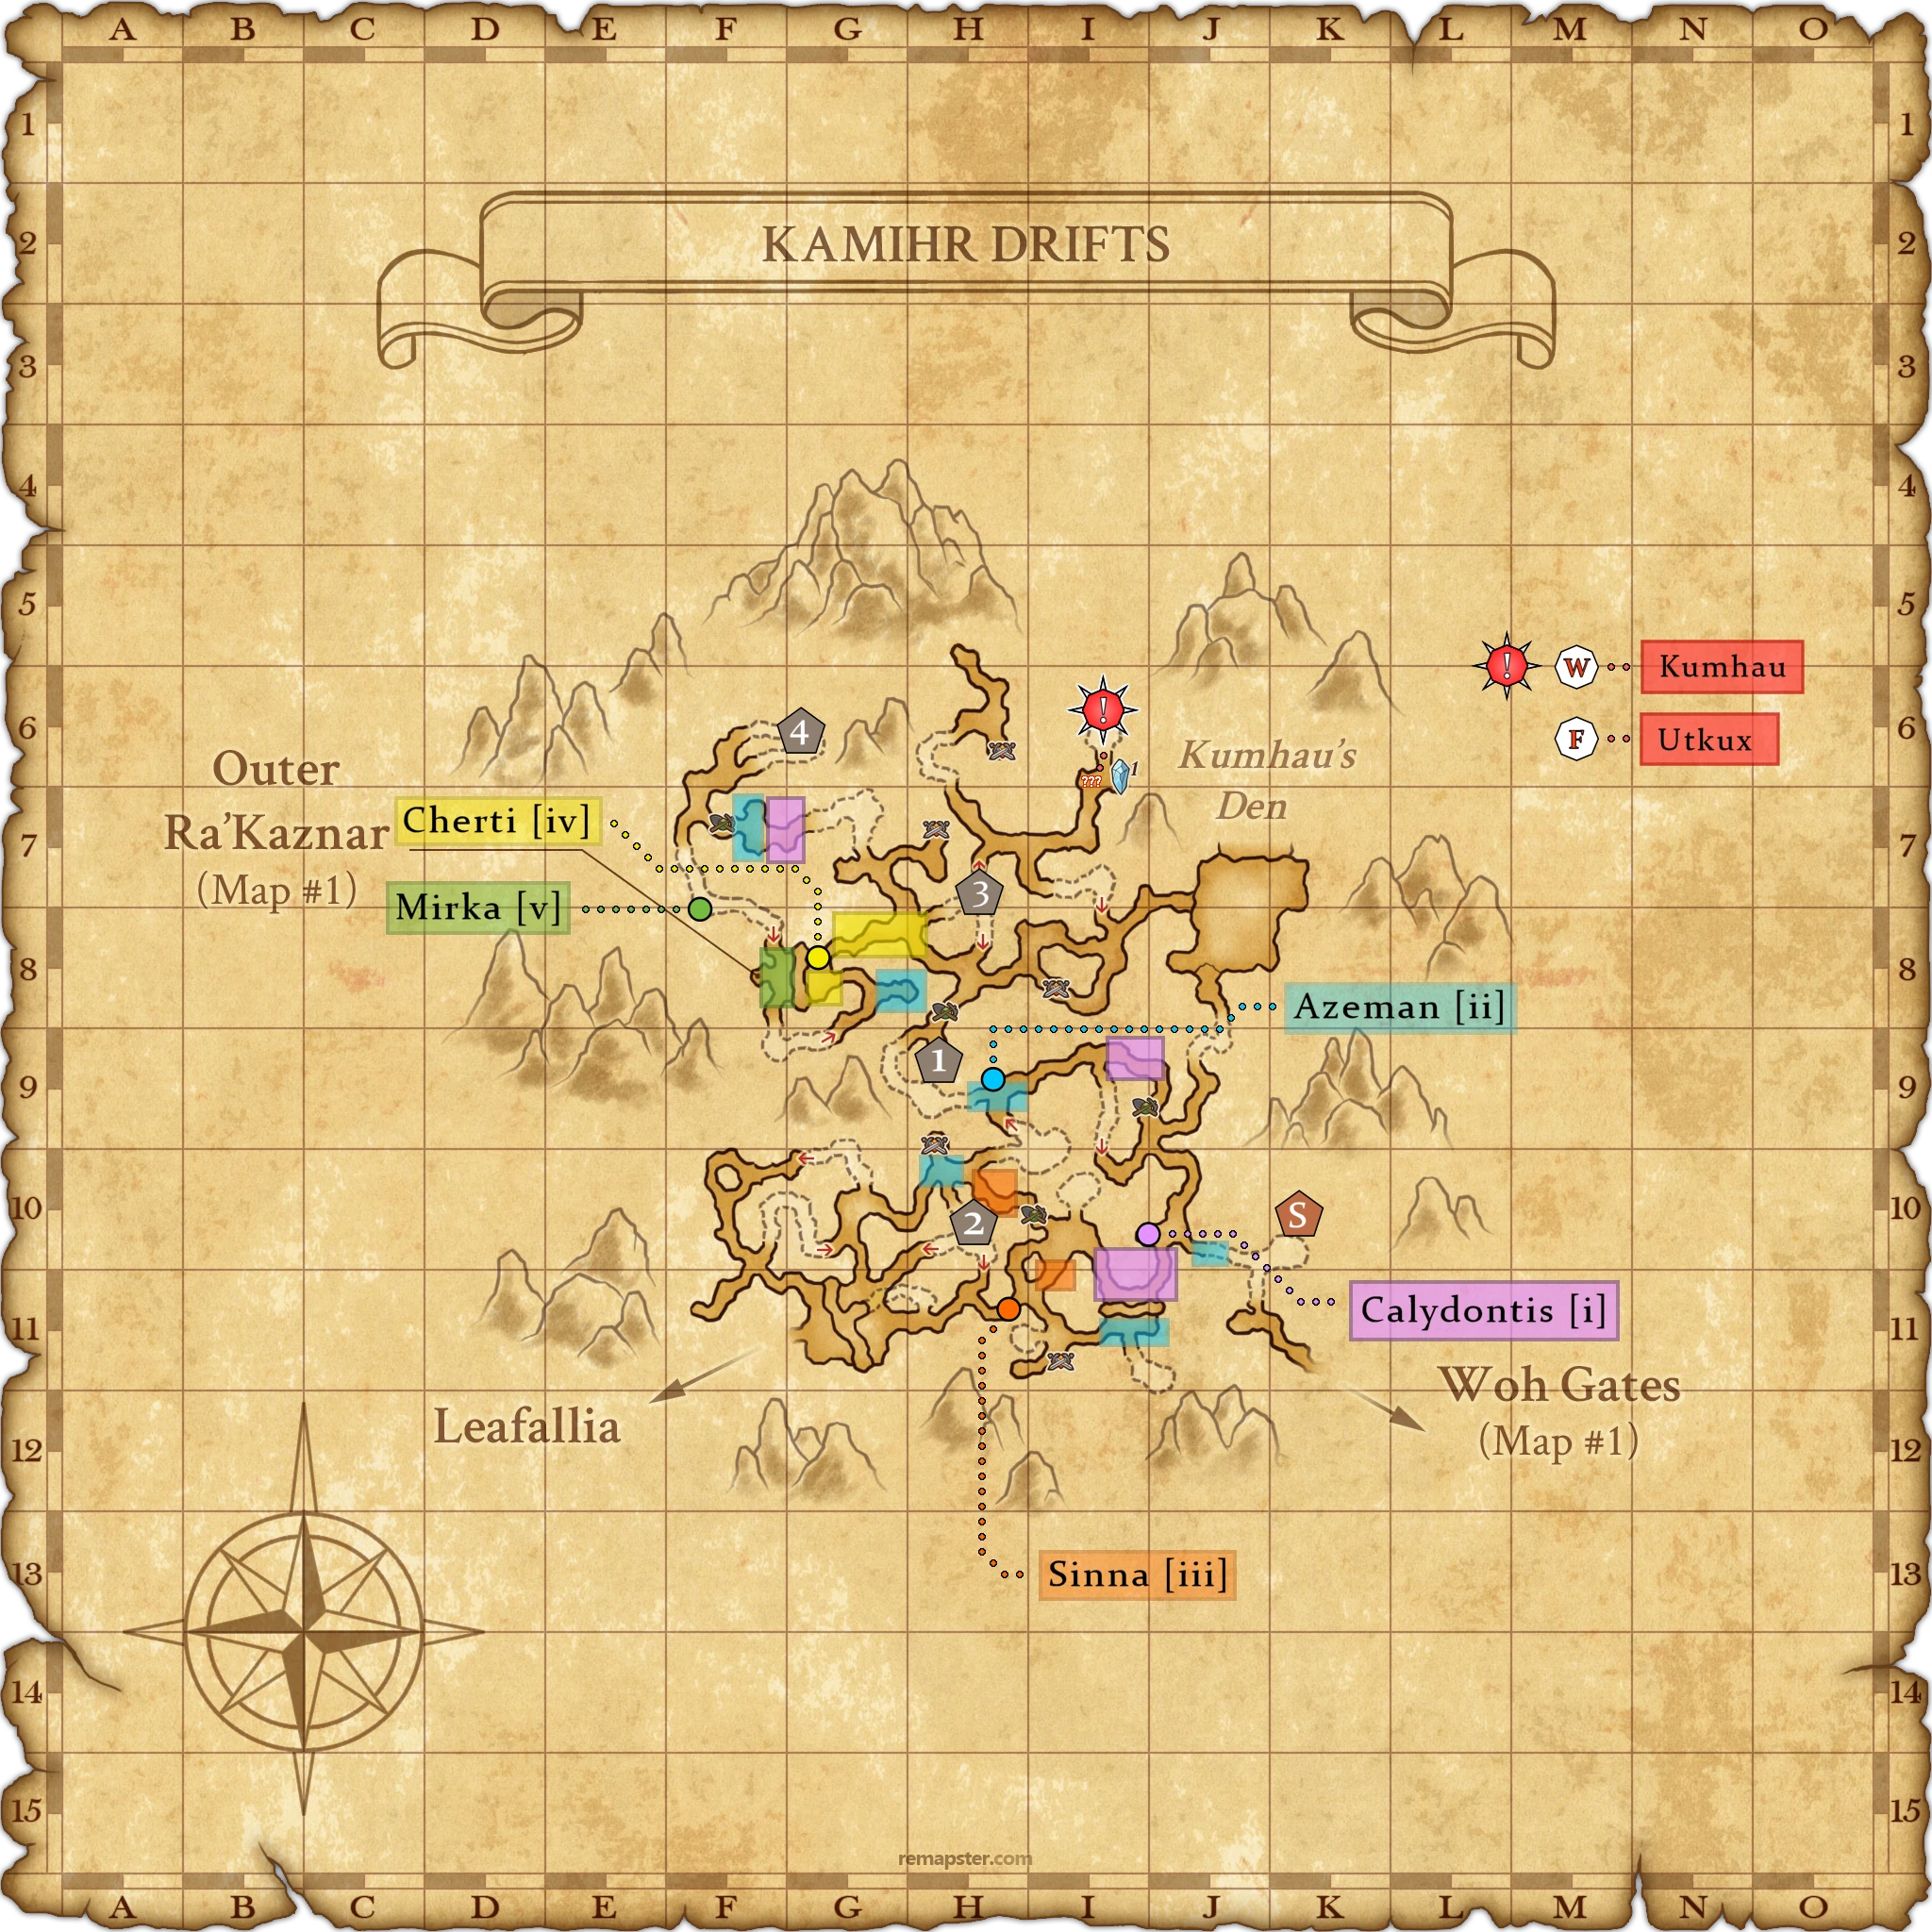
Kamihr Drifts Aster
In the cold tundra of Kamihr Drifts, players will have a mixture of all the unique mechanics they’ve faced in other zones. Pay close attention to animations, the colors of “two-hour” effects, and other visual clues for how best approach these encounters.
| Shard | Drops from… | Spawns |
|---|---|---|
| I | ashen tiger & snowpelt rabbit | Calydontis |
| II | cicatricose raaz & hailstone | Azeman |
| III | cyanotic raptor & wailing umbril | Sinna |
| IV | bedraggled lucerewe & slobbering ruszor | Cherti |
| V | gnarring yztarg & shaggy ovim | Mirka |
 (click to expand full-screen)
Maps modified with ❤️ via the Remapter project.
Looking to use the maps in game? Check out these .DATs courtesy of community member Genesis! Load them up as a separate folder in your Pivot config for easy on and off access or as a secondary map if you’re already using Remapster and Pivot!