Reisenjima
Entering Reisenjima requires players to achieve Heroic Rank 6 or higher. Players can enter the zone through the Dimensional Portal located in the Crags of Holla, Dem, or Mea.
Reisenjima ranges from level 135 to 165 and provides several unique challenges and mechanics for players. The zone is designed for balanced groups with tanks, support, and damage dealers depending on the encounter. While it is possible to solo content in Reisenjima, it’s highly recommended to group up with other players.
Deliveries
Speak to Shiftrix near the entrance to Reisenjima after acquiring certain key items and trophies to gain mission rewards and bonus infamy.
Encounters
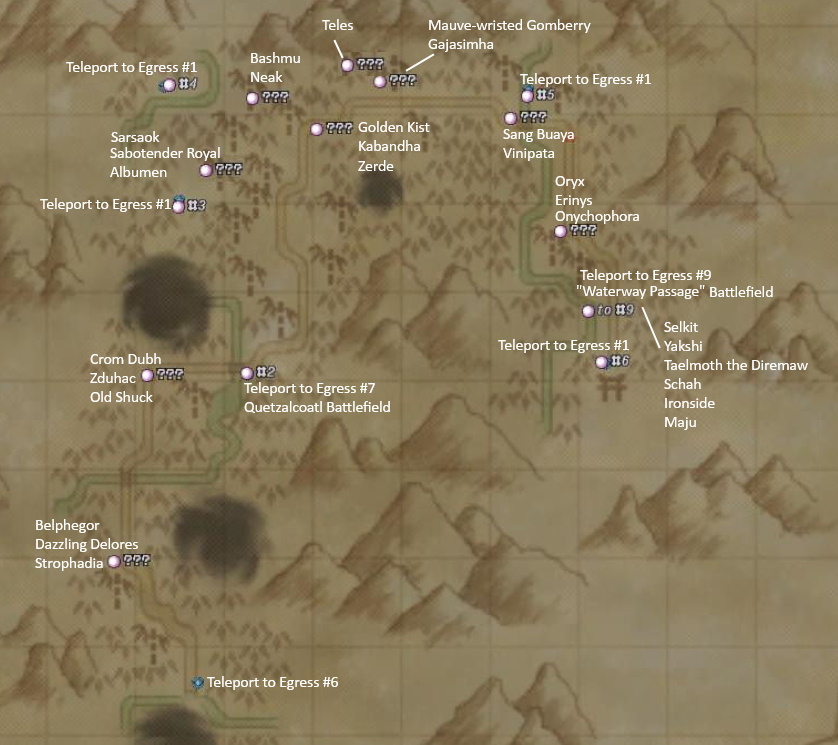
There are 47+ unique notorious monsters scattered throughout Reisenjima, separated into four “tiers”. The tier “0” monsters are spawned by defeating the various roaming monster families in the zone. Tiers 1 through 4 are spawned at various ??? locations and battlefields within the zone. Players can use the Ethereal Ingress teleport system to move around the zone. Unlike retail, all teleport locations are automatically unlocked.
Spawned NMs
Similar to retail servers, several monster groups will spawn a challenging NM as they are defeated. This NM will attack suddenly and could overwhelm an unprepared player–so be careful!
There is a five (5) minute cooldown on how often one of these NMs can spawn and only one can be up in the zone at a time, so coordination with other players is key. Each trigger has two NMs that drop it (from two different monster families) to allow more variety in farming for trigger items.
Each of the spawned NMs has a chance to drop four unique items (trigger items are not guaranteed). A unique, exclusive “trigger” along with three types of stones: pellucid, fern, and taupe.
The triggers are used to spawn the Gaes Fete tier 1 monsters and the stones, when used in conjunction with a key item, the Succulent Dragon Fruit, allows players to spawn the fearsome Quetzelcoatl! Succulent Dragon Fruit has a 5% chance to drop from any ascended monster.
| Monster Group | NM | Trigger |
|---|---|---|
| Rampaging Beetle | Ascended Beetle | Levigated Rock |
| Territorial Mantis | Ascended Mantis | Levigated Rock |
| Agitated Chapuli | Ascended Chapuli | G. Seed Pouch |
| Devouring Mosquito | Ascended Mosquito | G. Seed Pouch |
| Arboreal Chigoe | Ascended Chigoe | Copse Candy |
| Perfevid Nakara Ignoble Skeleton |
Ascended Naraka | Copse Candy |
| Asphyxiating Cyhiraeth | Ascended Cyhiraeth | Nyumomo Doll |
| Obsterperous Panopt | Ascended Panopt | Nyumomo Doll |
| Indomitable Faaz | Ascended Faaz | Supple Skin |
| Lentic Toad | Ascended Poroggo | Supple Skin |
| Water Elemental | Ascended Gefyrst | Ecarlate Cloth |
| Porxie | Ascended Porxie | Ecarlate Cloth |
| Quarrelsome Hippogryph | Ascended Hippogryph | Fortune Fruit |
| Snaggletoothed Tiger | Ascended Tiger | Fortune Fruit |
| Lucani | Ascended Lucani | Lebondopt Wing |
| Thunder Elemental | Ascended Ungeweder | Lebondopt Wing |
| Glowering Ladybug | Ascended Luckybug | Pulchridopt Wing |
| Wanton Danaid Officious Unseelie |
Heavenly Veela | Pulchridopt Wing |
In addition to drops, each party member will gain 15 infamy points for defeating a spawned NM.
Geas Fete - Tier 1
As players collect trophies from the spawned NMs, they can spawn the tier 1 Gaes Fete encounters at the various ??? spread throughout the zone. Each ??? point will tell players what encounters are possible at it. Trade the required items to the ??? to begin the encounter.
Each tier 1 encounter has a 75% chance to provide the each party member with a key item that can be used to spawn a tier 2 Gaes Fete encounter and grants 45 infamy points.
| Monster | Required Triggers | Key Item |
|---|---|---|
| Belphegor | 2x Copse Candy Myumomo Doll Ecarlate Cloth |
Belphegor’s Crown |
| Crom Dubh | 2x Ecarlate Cloth Supple Skin Fortune Fruit |
Crom Dubh’s Helm |
| Dazzling Dolores | 2x G. Seed Pouch Lebondopt Wing Fortune Fruit |
Dazzling Dolores’ Vine |
| Golden Kist | 2x Fortune Fruit Pulchridopt Wing Levigated Rock |
Golden Kist’s Key |
| Kabandha | 2x Nyumomo Doll Supple Skin Levigated Rock |
Kabandha’s Wing |
| Mauve-wristed Gomberry | 2x Lebondopt Wing Supple Skin Ecarlate Cloth |
Mauve-wristed Gomberry’s Knife |
| Oryx | 2x Supple Skin Pulchridopt Wing Ecarlate Cloth |
Oryx’s Plumage |
| Sabotender Royal | 2x Fortune Fruit Ecarlate Cloth G. Seed Pouch |
Sabotender Royal’s Needle |
| Sang Buaya | 2x Supple Skin Levigated Rock Lebondopt Wing |
Sang Buaya’s Tusk |
| Selkit | 2x Levigated Rock G. Seed. Pouch Pulchridopt Wing |
Selkit’s Pincer |
| Taelmoth the Diremaw | 2x Nyumomo Doll Lebondopt Wing Ecarlate Cloth |
Taelmoth’s Staff |
| Zduhac | 2x Lebondopt Wing Copse Candy Pulchridopt Wing |
Zduhac’s Talon |
Geas Fete - Tier 2
Players who have acquired the various key items from tier 1 can use those key items and an elemental cluster to spawn tier 2 Gaes Fete encounters at various ??? spread throughout the zone. Trade the required elemental cluster to the ??? to begin the encounter. Only the player trading the cluster will have their key items checked and removed (similar to voidwatch encounters).
Each tier 2 encounter has a 100% chance to provide party members with a key item that can be used to spawn a tier 3 Gaes Fete encounters and grants 65 infamy points.
| Monster | Required Key Items | Cluster | Key Item |
|---|---|---|---|
| Bashmu | Golden Kist’s Key Sabotender Royal’s Needle |
Earth | Bashmu’s Trinket |
| Gajasimha | Kabandha’s Wing Oryx’s Plumage |
Fire | Gajasimha’s Mane |
| Ironside | Belphegor’s Crown Crom Dubh’s Helm |
Ice | Ironside’s Maul |
| Old Shuck | Dazzling Delores’ Vine Mauve-wristed Gomberry’s Kinfe |
Wind | Old Shuck’s Tuft |
| Sarsaok | Selkit’s Pincer Taelmoth’s Staff |
Water | Sarsaok’s Hoard |
| Strophadia | Sang Buaya’s Tusk Zduhac’s Talon |
Lightning | Strophadia’s Pearl |
Gaes Fete - Tier 3
Players who have acquired the various key items from tier 2 can use those and an elemental cluster to spawn tier 3 Gaes Fete encounters at various ??? spread throughout the zone. Trade the required elemental cluster to the ??? to begin the encounter. Only the player trading the cluster will have their key items checked and removed (similar to voidwatch encounters).
Each tier 3 encounter has a 100% chance to provide party members with a key item that can be used to spawn a tier 4 Gaes Fete encounters and grants 85 infamy points.
| Monster | Required Key Items | Cluster | Key Item |
|---|---|---|---|
| Albumen | Bashmu’s Trinket Ironside’s Maul Sarsaok’s Hoard |
Fire | Albumen’s Flower |
| Erinys | Gajasimha’s Mane Old Shuck’s Tuft Ironside’s Maul |
Wind | Erinys’ Beak |
| Onychophora | Strophadia’s Pearl Old Shuck’s Tuft Bashmu’s Trinket |
Earth | Onychophora’s Soil |
| Schah | Sarsaok’s Hoard Strophadia’s Pearl Ironside’s Maul |
Ice | Schah’s Gambit |
| Teles | Gajasimha’s Mane Sarsaok’s Hoard Ironside’s Maul |
Thunder | Teles’s Hymn |
| Vinipata | Old Shuck’s Tuft Bashmu’s Trinket Sarsaok’s Hoard |
Water | Vinipata’s Blade |
| Zerde | Gajasimha’s Mane Strophadia’s Pearl Old Shuck’s Tuft |
Dark | Zerde’s Cup |
Gaes Fete - Tier 4
The final tier of Gaes Fete in Reisenjima. Players who have acquired the various key items from tier 3 can use those and an elemental cluster to spawn tier 4 Gaes Fete encounters at various ??? spread throughout the zone. Trade the required elemental cluster to the ??? to begin the encounter. Only the player trading the cluster will have their key items checked and removed (similar to voidwatch encounters).
Each tier 4 encounter has a 100% chance to provide party members with a key item can be turned into Shiftrix for two (2) Peacekeepers Coalition mission completions (if players have unlocked Peacekeepers) and grants 100 infamy points.
| Monster | Required Key Items | Cluster | Key Item |
|---|---|---|---|
| Maju | Albumen’s Flower Erinys’ Beak Onychophora’s Soil |
Earth | Maju’s Claw |
| Neak | Schah’s Gambit Teles’ Hymn Vinipata’s Blade |
Dark | Neak’s Treasure |
| Yakshi | Zerde’s Cup Schah’s Gambit Vinipata’s Blade |
Light | Yakshi’s Scroll |
Quetzalcoatl
Once players receive the key item from an Ascended monster, they can spawn Quetzalcoatl at his battlefield (take the Ingress teleports to location “#7 - ???”) with 10 of each of the stones (pellucid, fern, and taupe).
Quetzalcoatl rewards players with unique loot items, 100 infamy points, and one (1) Peacekeepers Coalition mission completion (if players have unlocked Peacekeepers).
There is no cooldown on spawning Quetzalcoatl assuming players have the proper key item and stones.