Escha - Ru'Aun
Entering Escha - Ru’Aun requires players to achieve Heroic Rank 8 or higher. Players can enter the zone through the Undulating Confluence located in Miseraeux Cost near the homepoint crystal at G-5.
Escha Ru’Aun ranges from level 145 to 170 and provides several new challenges to players. While it is possible to solo content in Escha Ru’Aun, it’s highly recommended to group up with other players. Many of the encounters have adds ( that’s seriously the theme of this zone) and require certain positionals, damage types, and magic types to damage or knock encounter from phone phase to another.
About the Zone
The darkness creeping in to Ru’Aun has let loose numerous luminians, luminions, vorageans, and empty-type monsters loose on the Gardens.
In addition to the seen threats, there is a danger lurking around every corner ready to strike when you least expect it.
Encounters
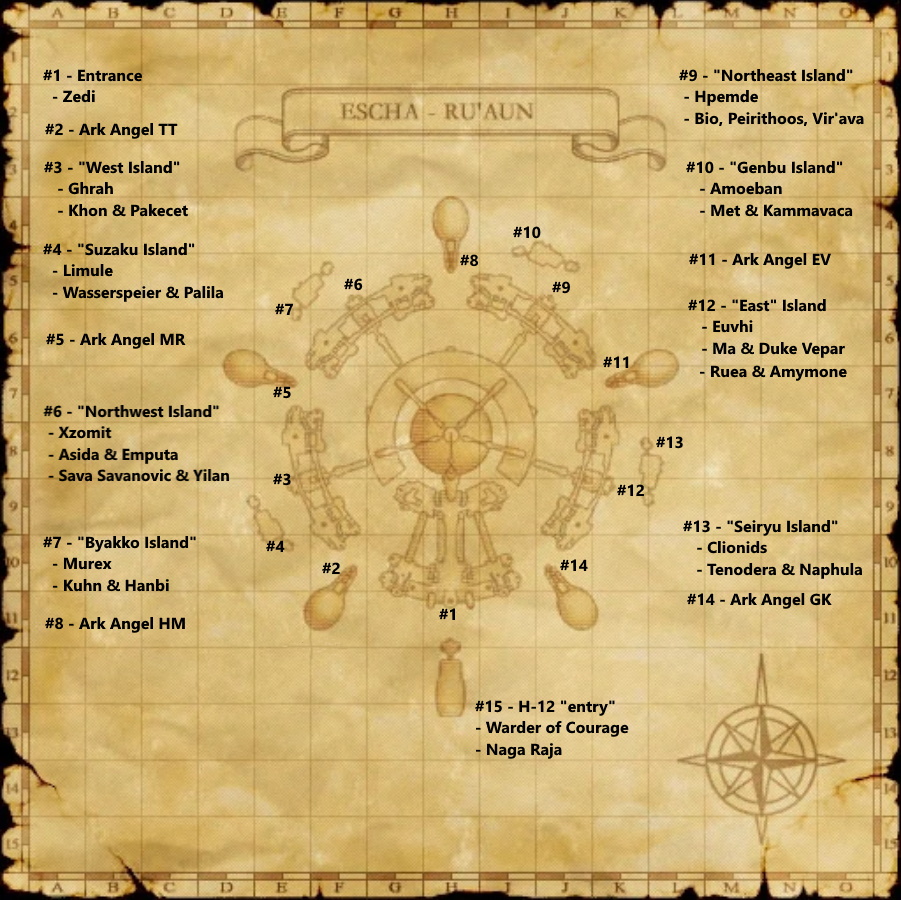
There are 35+ unique notorious monsters scattered throughout Escha Ru’aun, separated into multiple groups with multiple paths.
- The Ark Angels
- The Nazar
- The Heavenly Beasts
- Gaes Fete, tiers 1 to 3
- the zone boss, Naga Raja
As with previous Heroics zones, the combat and mechanics of many of these encounters is based off of their retail fights. Many of the same behaviors, success and fail conditions, and abilities are are scripted to be similar; however, several have our own custom twist. Pay close attention to the animations, combat text, and actions to be successful. The guides on BG-Wiki and FFXIcyclopedia can provide directional guidance as well.
The Ark Angels
The Ark Angels have escaped the La’Loff Amphitheater and wait on each of their respective islands for worthy challengers.
The ashweed used to draw them out is dropped from various Eschan mobs, specifically Eschan Il’Aerns found throughout the zone. Once enough ashweed is collected, trade a Dark Cluster, the ashweed, and a piece of parchment to the location to begin the battle.
| Ark Angel | Required Trade |
|---|---|
| AA EV | Dark Cluster, Parchment, 24x Ashweed |
| AA HM | Dark Cluster, Parchment, 24x Ashweed |
| AA TT | Dark Cluster, Parchment, 24x Ashweed |
| AA MR | Dark Cluster, Parchment, 24x Ashweed |
| AA GK | Dark Cluster, Parchment, 24x Ashweed |
The Nazar
The Nazar have a chance to spawn from the various open world luminians, luminions, vorageans, and empties scattered around the islands. Each Warder has a 100% chance to drop their charms (key items) when defeated. Each battle participant has their own unique chance at receiving this key item. These Nazar key items are used to spawn the final Warder–the Warder of Courage.
The Warder is aligned with the type of enemy used to spawn it. For example, Warder of Temperance is a Zdei and Warder of Love is a Yovra.
There is a slight cooldown on how often one of these NMs can spawn and only one can be up in the zone at a time, so coordination with other players is key.
The Escha Yovras are the rarest to find and are spread out on the four Heavenly Beast islands.
| Monster Group | NM | Key Item |
|---|---|---|
| Eschan Zdei | Warder of Temperance | Primary nazar |
| Eschan Ghrah | Warder of Fortitude | Secondary nazar |
| Eschan Euvhi | Warder of Faith | Tertiary nazar |
| Eschan Xzomit | Warder of Justice | Quaternary nazar |
| Eschan Phuabo | Warder of Hope | Quinary nazar |
| Eschan Hpemde | Warder of Prudence | Senary nazar |
| Eschan Yovra | Warder of Love | Septenary nazar |
| Eschan Limule | Warder of Dignity | Octonary nazar |
| Eschan Clionid | Warder of Loyalty | Nonary nazar |
| Eschan Murex | Warder of Mercy | Denary nazar |
The Warder of Prudence is a multi-phase fight. Killing both at the same time can result in not getting loot as, depending on server ticks and randomness, the next phase may not spawn.
Players possessing all ten (10) Nazar key items can trade Dremi a Light Cluster and 2,000,000 gil to convert them into a Primal nazar. Players possessing the Primal nazar key item can trade a Light Cluster to the ??? on the H-12 “entry” island to spawn the Warder of Courage.
Heavenly Beasts
The Heavenly Beasts have been corrupted by the darkness and their seals have been scattered on their various islands.
To spawn each Heavenly Beast, retrieve three (3) scraps of their seals and trade the scraps with 500,000 gil to Dremi to receive the appropriate key item. For example, to receive the Byakko’s Pride key item, trade Dremi 3x “Seal of Byakko Scrap” and 500,000 gil. These scraps are normal drops and can be improved with Treasure Hunter skill.
Once a key item is acquired, trading the corresponding crystal cluster while possessing the key item will spawn the Heavenly Beast on its respective island.
| Heavenly Beast | Scraps Source | Spawn Cluster | Key Item |
|---|---|---|---|
| Byakko | Eschan Murex | Light Cluster | Byakko’s Pride |
| Suzaku | Eschan Limule | Fire Cluster | Suzaku’s Benefaction |
| Genbu | Eschan Amoeban | Water Cluster | Genbu’s Honor |
| Seiryu | Eschan Clionid | Wind Cluster | Seiryu’s Nobilit |
Once all four Heavenly Beasts have been defeated at least once (and players have acquired the titles), players may trade five (5) of each scrap with 2, 000, 000g to Dremi to receive the key item Kirin’s Fervor. Players possessing the Kirin’s Fervor key item can trade an Earth Cluster to the ??? on the H-12 “entry” island to spawn Kirin.
Kirin’s fight is multi-phased. The final encounter boss, Kouryu, contains the loot table.
Geas Fete - Tier 1
As players collect key items from the Nazar, they can be used to spawn the tier 1 Gaes Fete encounters at the various ??? spread throughout the zone. Each ??? point will tell players what encounters are possible at it. Trade the required items to the ??? to begin the encounter.
Each tier 1 encounter has a 50% chance to provide the party members with a temporary key item that can be used to spawn a tier 2 Gaes Fete encounter.
| Monster | Required Trade | Required Key Items | Key Item |
|---|---|---|---|
| Asida | 5x Void Grass | Primary, Tertiary, Quinary nazars | Asida’s gel |
| Bia | 5x Gravewood Log | Primary, Secondary, Octonary nazars | Bia’s glove |
| Emputa | 5x Gravewood Log | Quaternary, Senary, Denary nazars | Emputa’s wing |
| Khon | 5x Void Grass | Secondary, Senary, Denary nazars | Khon’s scepter |
| Peirithoos | 5x Void Grass | Secondary, Quinary, Octonary nazars | Peirithoos’ hoof |
| Ma | 5x Gravewood Log | Tertiary, Quinary, Octonary nazars | Ma’s lance |
| Wasserspeier | 5x Void Grass | Primary, Senary, Nonary nazars | Wasserspeier’s horn |
| Khun | 5x Gravewood Log | Tertiary, Senary, Nonary nazars | Khun’s crown |
| Sava Savanovic | 5x Void Grass | Quaternary, Septenary, Denary nazars | Sava Savanovic’s cape |
| Met | 5x Gravewood Log | Primary, Quinary, Septenary nazars | Met’s ring |
| Tenodera | 5x Void Grass | Quaternary, Septenary, Octonary nazars | Tenodera’s scythe |
| Ruea | 5x Gravewood Log | Secondary, Septenary, Octonary nazars | Ruea’s stone |
Geas Fete - Tier 2
Players who have acquired the various key items from tier 1 can use those key items and various void items found throughout the zone to spawn tier 2 Gaes Fete encounters at various ??? spread throughout the zone. Trade the required items while possessing the required key items to the ??? to begin the encounter. Only the player trading the cluster will have their key items checked and removed (similar to voidwatch encounters).
Each tier 2 encounter has a 50% chance to provide party members with a temporary key item that can be used to spawn a tier 3 Gaes Fete encounters.
| Monster | Required Trade | Required Key Items | Key Item |
|---|---|---|---|
| Amymone | 5x Gravewood Log 5x Ashweed |
Asida, Bia | Amymone’s tooth |
| Hanbi | 5x Void Grass 5x Ashweed |
Emputa, Khon | Hanbi’s nail |
| Kammavaca | 5x Gravewood Log 5x Ashweed |
Peirithoos, Ma | Kammavaca’s binding |
| Naphula | 5x Void Grass 5x Ashweed |
Wasserspeier, Khun | Naphula’s bracelet |
| Palila | 5x Gravewood Log 5x Ashweed |
Sava Savanovic, Met | Palila’s talon |
| Yilan | 5x Void Grass 5x Ashweed |
Tenodera, Ruea | Yilan’s scale |
Gaes Fete - Tier 3
The final tier of Gaes Fete in Escha - Ru’Aun. Players who have acquired the various key items from tier 2 can use those and various void items found throughout the zone to spawn tier 3 Gaes Fete encounters at various ??? spread throughout the zone. Trade the required items while possessing the required key items to the ??? to begin the encounter. Only the player trading the cluster will have their key items checked and removed (similar to voidwatch encounters).
Each tier 3 encounter has a 100% chance to provide party members with a temporary key item that can be turned into Alfi at the zone entrance for a reward of Heroics points and a random chance at various items.
| Monster | Required Trade | Required Key Items | Key Item |
|---|---|---|---|
| Duke Vepar | 12x Void Grass 12x Ashweed 12x Gravewood Log |
Amymone, Naphula | Duke Vepar’s signet |
| Pakecet | 12x Void Grass 12x Ashweed 12x Gravewood Log |
Hanbi, Yilan | Pakecet’s blubber |
| Vir'ava | 12x Void Grass 12x Ashweed 12x Gravewood Log |
Kammavaca, Palila | Vir’ava’s vine |
Gaes Fete - Zone Boss
Players who want to challenge the zone boss, Naga Raja, can do so at H-12. While possessing the key items from Vir’ava, Pakecet, and Duke Vepar, trade 24 of each void item (void grass, gravewood log, and ashweed) to the spawn point to being the fight.
Deliveries
Speak to Dremi near the entrance to Escha Ru’Aun after acquiring certain key items and trophies to gain mission rewards and bonus infamy.
- Eschan Ash from Warder of Courage (Primal Nazar)
- Duke Vepar’s Signet from Duke Vepar (Gaes Fete tier 3)
- Pakecet’s Blubber from Pakecet (Gaes Fete tier 3)
- Vir’ava’s Stalk from Vir’ava (Gaes Fete tier 3)
Abjurations
The Gaes Fete encounters drop numerous abjurations decurse crafted cursed gear into wearable armor. There are eleven abjuration sets available in Escha Ru’aun: Abyssal, Arean, Bushin, Cronian, Cyllenian, Grove, Jovian, Shinryu, Triton, Vale, and Venerian.
Each of these sets is targets to specific jobs and playstyles.
How do abjurations work?
While common in early 75 of sky, HNMs, and Einherjar, abjurations haven’t shown up in recent content patches. For many players, this will be a new experience.
When creating abjuration armors, there are NQ (non-quality) and HQ (high quality) versions of the cursed items. NQ cursed items result in a NQ version of the abjuration armor when purified. HQ cursed items result in a HQ version of the abjuration armor.
For example, to create the Carmine Scale Mail +1 item, I would need a HQ version of the cursed item, the Voodoo Mail and the abjuration pattern, the Shinryu Abjuration: Body dropped from Duke Vepar. The cursed items can be created and traded among players, however, abjurations are rare/ex.
Once players have both items, trade them to Alphollon C. Meriard in the Catherdial in Northern San d’Oria to receive the purified item.
Is there a difference between the NQ and HQ versions?
Yes. Many pieces have a significant stat difference between the two versions and the HQ versions include set bonuses.
Why are there two different recipes to craft the abjuration armors?
No idea. In theory, the recipe that is lower level that requires a prior tier HQ cursed item should be easier to HQ, but requires more upfront work. This is a crafter theory question. :)
Is there anything special about the abjuration armors?
Yes. Rather than adding a new tier of augments, all abjurations (both NQ and HQ) have unique augments on them and come pre-augmented when received from Alphollon C. Meriard. Many of these augments based on the augments that players could receive on these pieces on retail and are rare or unique to the armor sets.
HQ items typically have more augments and higher augment stats than the NQ counterparts. Players can remote and put new augments on these items; however, to get these augments back, the item would need to be dropped and reacquired through the abjuration process.
Apogee
| Slot | NQ Augment | HQ Augments |
|---|---|---|
| Head | Pet: MACC/MAB +15 Pet: MDEF +20 |
Pet: MACC/MAB +20 Pet: MDEF +30 BP Damage +8 |
| Body | Pet: ATT/RATT +12 Pet: DEF +10 |
Pet: ATT/RATT +20 Pet: Defense +15 Summoning +10 |
| Hands | Enmity -10 Blood Boon +5 |
Enmity -20 Blood Boon +10 Pet: Enmity +20 Pet: Magic Damage +20 |
| Legs | INT +8 MND +8 BP Damage +5 |
INT +15 MND +15 BP Damage +10 Pet: Magic Damage +30 |
| Feet | Pet: Magic Damage +10 Pet: ATT/RATT/ACC/RACC +12 |
Pet: Magic Damage +15 Pet: ATT/RATT/ACC/RACC +20 Pet: MACC/MAB +7 Cure Potency Rcvd +5% |
Ryuo
| Slot | NQ Augment | HQ Augments |
|---|---|---|
| Head | Kick Attacks +7 STR +10 ATT/ACC +15 |
HP +65 Kick Attacks +10 STR +15 ATT/ACC +20 |
| Body | HP +65 ATT/ACC +12 Subtle Blow +4 |
HP +100 ATT/ACC +20 Subtle Blow +10 Critical Hit Damage +5% |
| Hands | EVA/MEVA +15 Weaponskill Accuracy +5 Triple Attack +5 |
EVA/MEVA +20 Weaponskill Accuracy +10 Triple Attack +8 Subtle Blow/Store TP +10 |
| Legs | STR +10 DEX +10 Weaponskill Damage +2 |
STR +15 DEX +15 Weaponskill Damage +6 Critical Hit Rate +6% |
| Feet | Meditate Duration +5 Skillchain Damage +5 Counter +3 |
Meditate Duration+10 Skillchain Damage +8 Counter +5 VIT +20 |
Souveran
| Slot | NQ Augment | HQ Augments |
|---|---|---|
| Head | Shield Block Rate +5 Weaponskill Damage +4% Enhancing Magic Duration +10 |
Shield Block Rate +10 Weaponskill Damage +8% Enhancing Magic Duration +20 Enmity +15 |
| Body | VIT +10 MND +10 Cure Potency Rcvd +5% |
VIT +15 MND +15 Cure Potency Rcvd +10% Enmity +5 |
| Hands | HP +65 ATT/ACC +15 STR +10 |
HP +100 ATT/ACC +20 STR +15 Enmity Crit Hit Rate -8% |
| Legs | DEF +15 Charm Resistance +5 Phalanx +15 |
DEF+20 Charm Resistance +10 Phalanx +30 Shield Mastery +10 |
| Feet | EVA/MEVA +10 ATT/ACC +10 Physical Damage Taken -2% |
EVA/MEVA +20 ATT/ACC +20 Physical Damage Taken -5% VIT +20 |
Emicho
| Slot | NQ Augment | HQ Augments |
|---|---|---|
| Head | ATT/ACC +10 DEF +10 HP +65 Pet: ATT/RATT +10 |
ATT/ACC +18 DEF +15 HP +75 Pet: ATT/RATT +18 |
| Body | Pet: ATT/RATT/ACC/RACC +10 ATT/ACC +10 HP +65 |
Pet: ATT/RATT/ACC/RACC +15 ATT/ACC +15 HP +100 MACC/MAB +15 |
| Hands | Pet: Breath Damage +5 Double Attack +5% STR +10 DEX +10 |
Pet: Breath Damage +10 Double Attack +10 STR +20 DEX +15 |
| Legs | Critical Hit Rate +4% Pet: Regen +25 Weaponskill Damage +5% |
Critical Hit Rate +8% Pet: Regen +25 Weaponskill Damage +8% Store TP/Subtle Blow +10 |
| Feet | Store TP +6 Critical Hit Rate +5% STR +10 |
Store TP +10 Critical Hit Rate +10% STR +15 Weaponskill Accuracy +8 |
Kaykaus
| Slot | NQ Augment | HQ Augments |
|---|---|---|
| Head | Helix Duration +5 Enmity -5 MACC/Magic Damage +10 |
Helix Duration +12 Enmity -10 MACC/Magic Damage +20 MND +15 |
| Body | MP +65 MDEF +10 Healing Skill +10 |
MP +65 MDEF +15 Healing Skill +15 Enhancing Skill +15 |
| Hands | Fast Cast +8 Divine Skill +10 MACC/MAB +10 |
Fast Cast +10 Divine Skill +15 MACC/MAB +16 Magic Damage +30 |
| Legs | Occ. Resist Status Effect +2 MP +65 Enhancing Skill +10 Regen Potency +5 |
Occ. Resist Status Effect +5 MP +65 Enhancing Skill +20 Regen Potency +10 |
| Feet | EVA/MEVA +10 Cure Potency +5% Regen Potency +5% Spell Interrupt Rate -5% |
EVA/MEVA +15 Cure Potency +8% Regen Potency +10% Spell Interrupt Rate -10% |
Rao
| Slot | NQ Augment | HQ Augments |
|---|---|---|
| Head | ATT/ACC +10 HP+65 Regen +10 |
ATT/ACC +20 HP +100 Regen +30 STR +10 |
| Body | EVA/MEVA +10 MDEF +10 Pet: Physical Damage Taken -1% |
EVA/MEVA +15 MDEF +15 Pet: Physical Damage Taken -3% Pet: Magic Damage Taken -3% |
| Hands | Damage Taken -4% Store TP/Subtle Blow +6 Pet: ATT/RATT/ACC/RACC +10 |
Damage Taken -6% Store TP/Subtle Blow +10 Pet ATT/RATT/ACC/RACC +20 Automaton Repair Potency +10 |
| Legs | Martial Arts +7 Critical Hit Damage +4 Triple Attack +5 |
Martial Arts +10 Critical Hit Damage +7 Triple Attack +7 Kick Attacks +9 |
| Feet | Skillchain Bonus +3 Weaponskill Damage +3% HP +65 |
Skillchain Bonus +5 Weaponskill Damage +5% HP +100 Ninja Tool Expertise +10 |
Adhemar
| Slot | NQ Augment | HQ Augments |
|---|---|---|
| Head | DEX +10 AGI +10 RATT/RACC +10 |
DEX +14 AGI +14 RATT/RACC +16 MACC/MAB +16 |
| Body | Waltz Potency +5 Parry +10 HP +65 |
Waltz Potency +10 Parry +15 HP +100 TP Bonus +500 |
| Hands | INT +10 STR +10 Blue Skill +15 |
INT +15 STR +15 Blue Skill +20 Physical Damage Taken -5% |
| Legs | Weaponskill Damage +3% Triple Attack +4% Snapshot +4 |
Weaponskill Damage +5% Triple Attack +6% Snapshot +8 Barrage +5 |
| Feet | Quick Draw Delay -2 ATT/ACC +10 Magic Damage Taken -2% |
Quick Draw Delay -4 ATT/ACC +16 Magic Damage Taken -4% Rapid Shot +5 |
Carmine
| Slot | NQ Augment | HQ Augments |
|---|---|---|
| Head | Critical Hit Damage +5 DEX +10 MND +10 |
Critical Hit Damage +8 DEX +15 MND +15 Weaponskill Damage +5% |
| Body | Spell Interrupt Rate -10 Enfeebling Magic +15 MACC/MAB +15 |
Spell Interrupt Rate -15 Enfeebling Magic +30 MACC/MAB +20 Cure Potency +5% |
| Hands | HP +65 Enhancing Skill +10 Enspell Damage +30 |
HP +100 Enhancing Skill +20 Enhancing Magic Duration +10 Enspell Damage +30 |
| Legs | MACC/Magic Damage +10 MAB +10 Elemental Skill +10 |
MACC/Magic Damage +15 MAB +18 Elemental Skill +20 Enfeeb. Magic Duration +10 |
| Feet | Dark Skill +10 ATT/ACC +10 Parrying Rate +2% |
Dark Skill +20 ATT/ACC +20 Parrying Rate +5% Physical Damage Taken -5% |
Amalric
| Slot | NQ Augment | HQ Augments |
|---|---|---|
| Head | Conserve MP +10 MACC/MAB +15 Magic Burst Bonus +5 |
Conserve MP +15 MACC/MAB +20 Magic Burst Bonus +8 Magic Damage +30 |
| Body | Helix Duration +10 INT +10 Elemental Skill +15 |
Helix Duration +15 INT +15 Elemental Skill +20 Enmity -11 |
| Hands | Dark Skill +10 Occult Acument +10 MACC/MAB +15 |
Dark Skill +15 Occult Acument +15 MACC/MAB +16 BP Damage +5 |
| Legs | MACC/Magic Damage +15 INT +10 Magic Damage Taken -3% |
MACC/Magic Damage +30 INT +15 Magic Damage Taken -5% Magic Burst Bonus +10 |
| Feet | Magic Critical Damage +5 Fast Cast +8 MP +65 |
Magic Critical Damage +10 Fast Cast +10 MP +65 INT +20 |
EXCEPTION: The Triton and Vale sets do not receive custom augments at this time as they are intended to be for style lock and/or very unique use cases. We’re evaluating how best to handle these two sets (aka: we have no idea why they have such crap stats yet come from equally challenging mobs) and if they have any play usage outside of reminding us of the good old days.